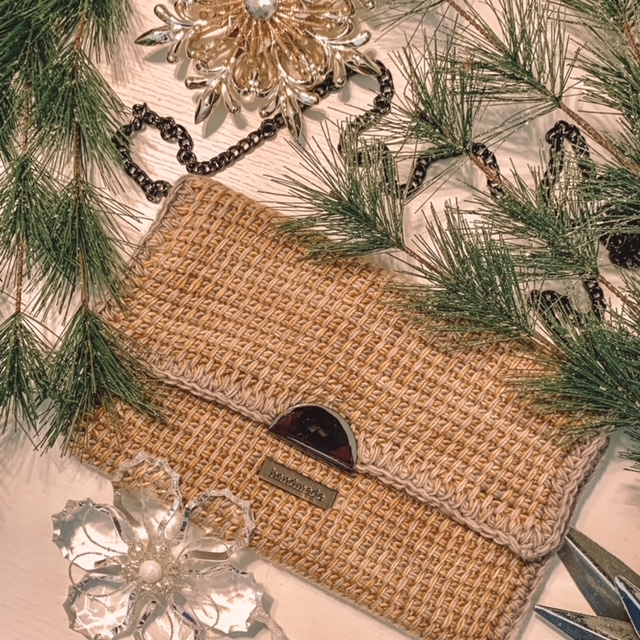
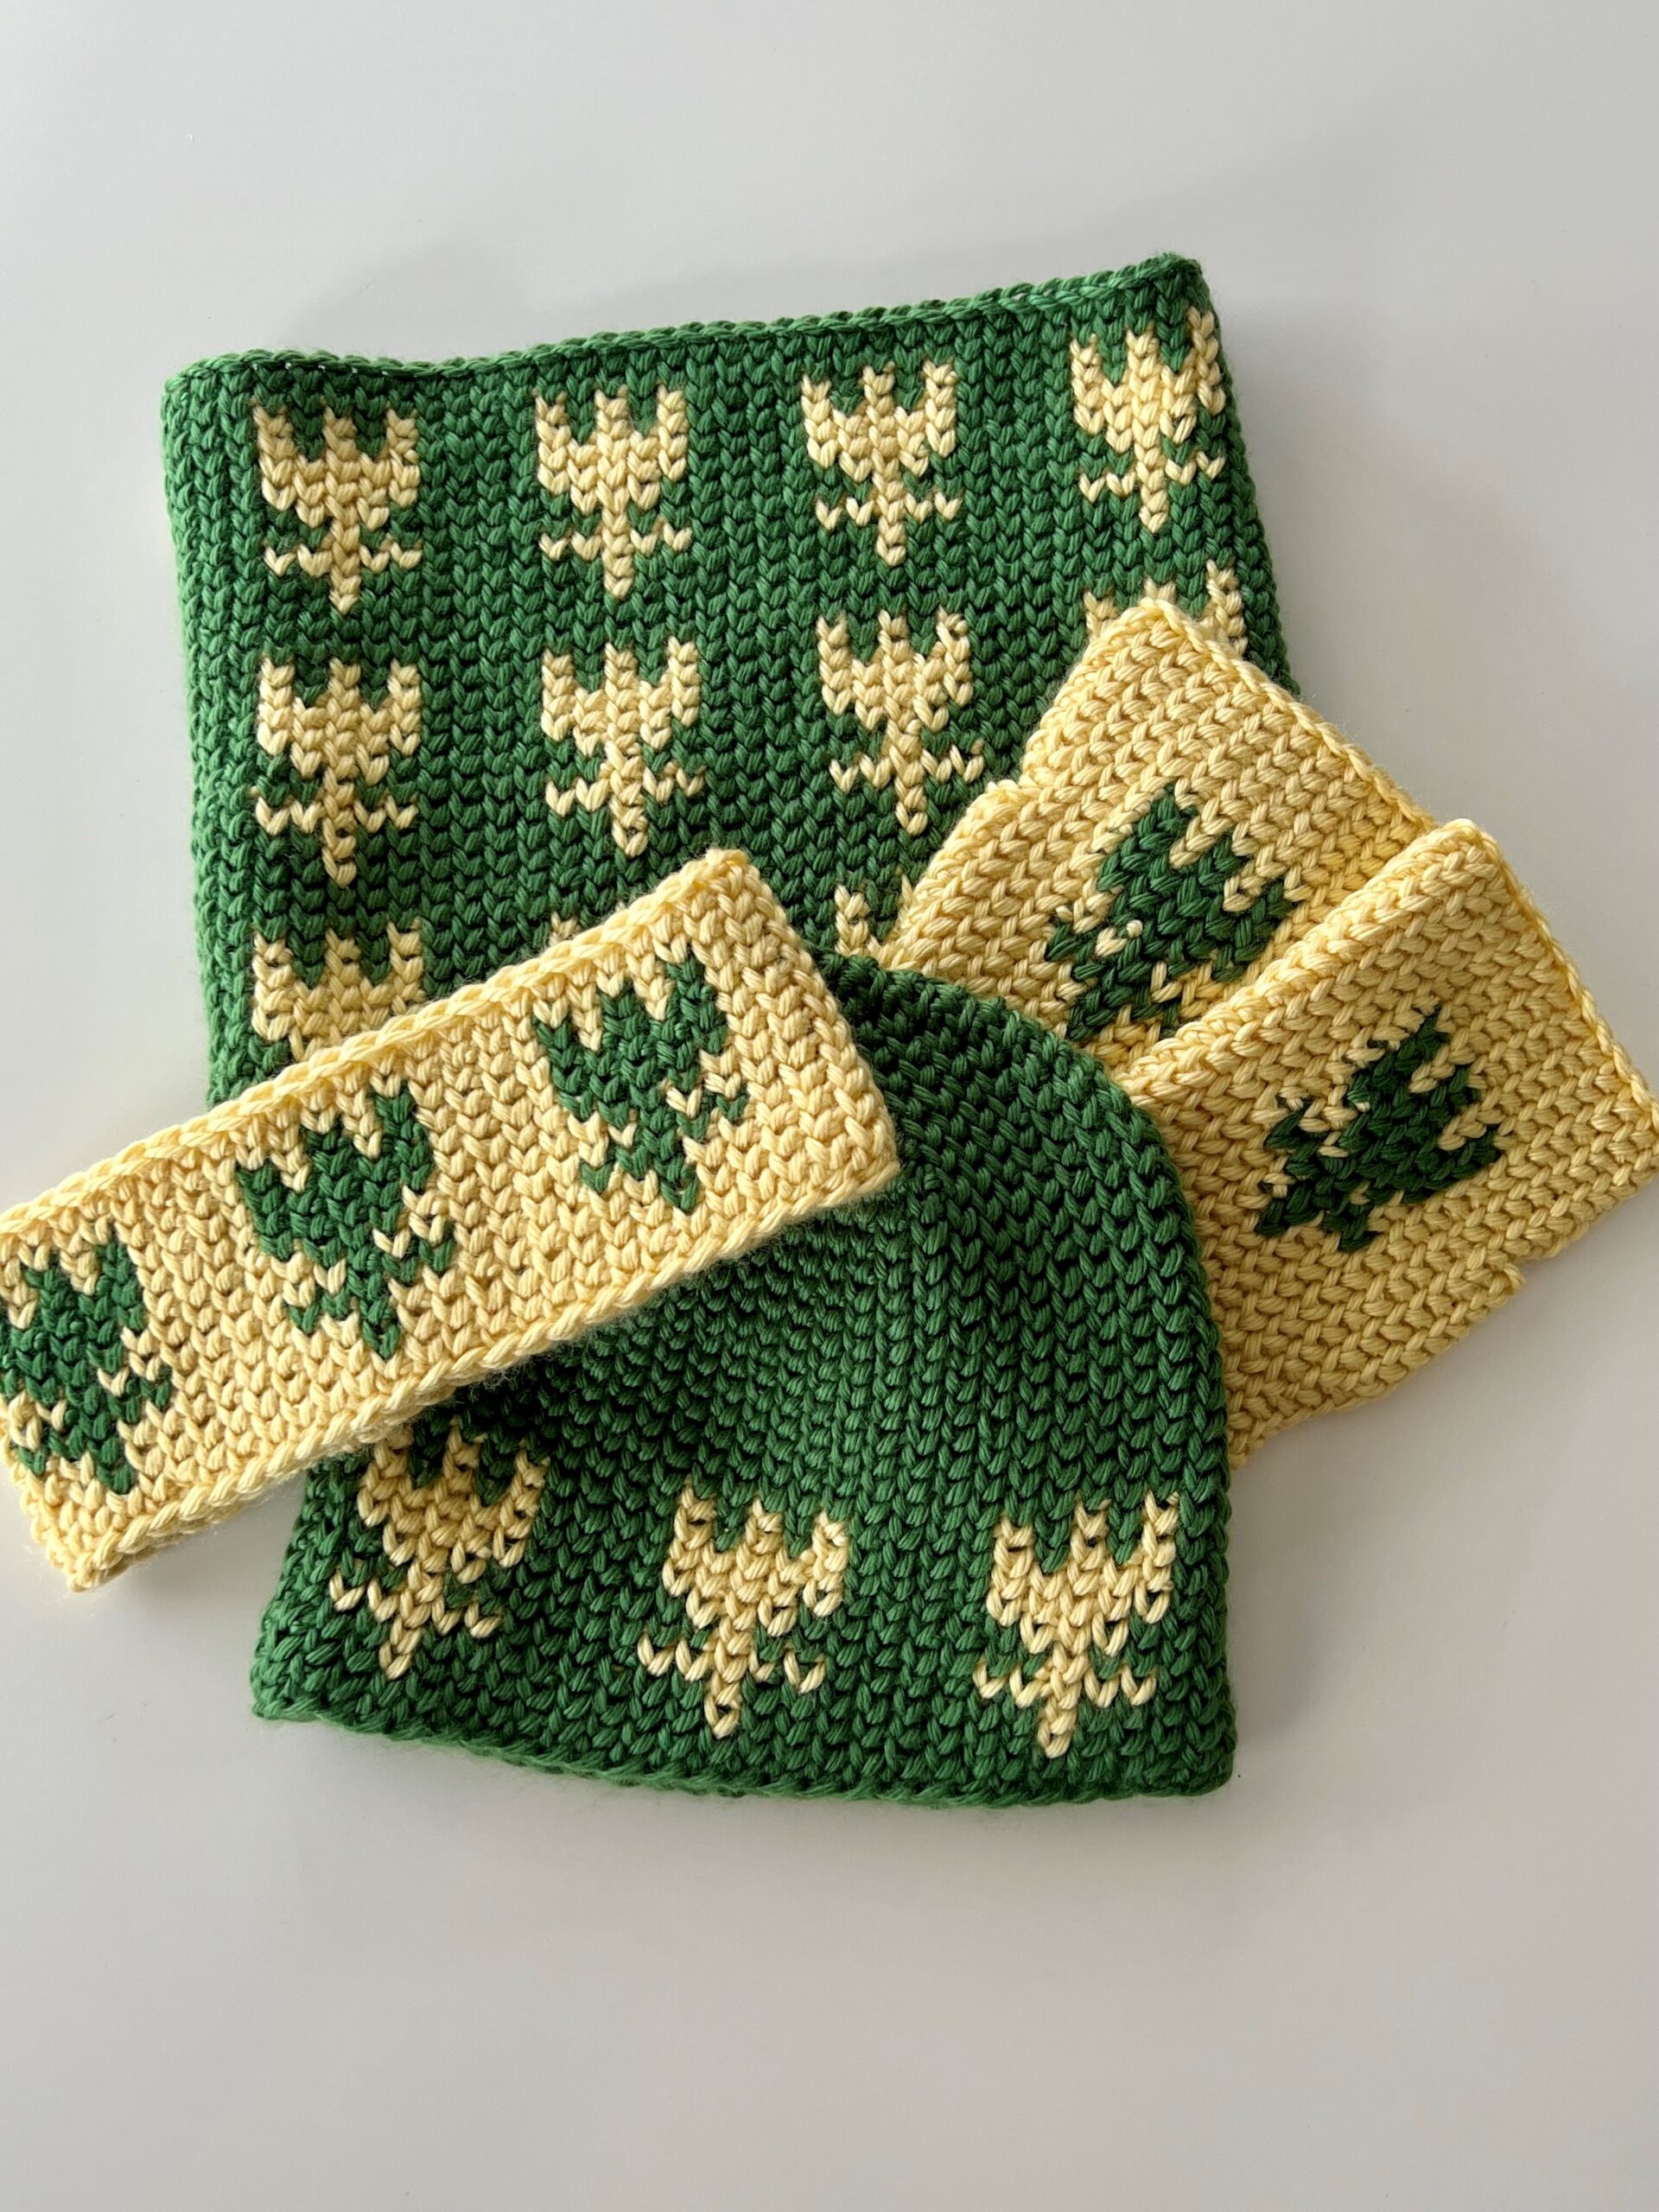
Hello friend! Have you noticed the First Signs of Springtime popping up all around? The daffodils and tulips are starting to poke out their first leaves here in the Midwest and it’s influenced a free crochet mini collection sponsored by our wonderful friends over at Furls Crochet! The First Signs of Springtime – Free Crochet Collection includes a hat, cowl, earwarmer and fingerless mitts that are decorated with a fun, easy-to-memorize tulip design to usher in the beginning of spring!
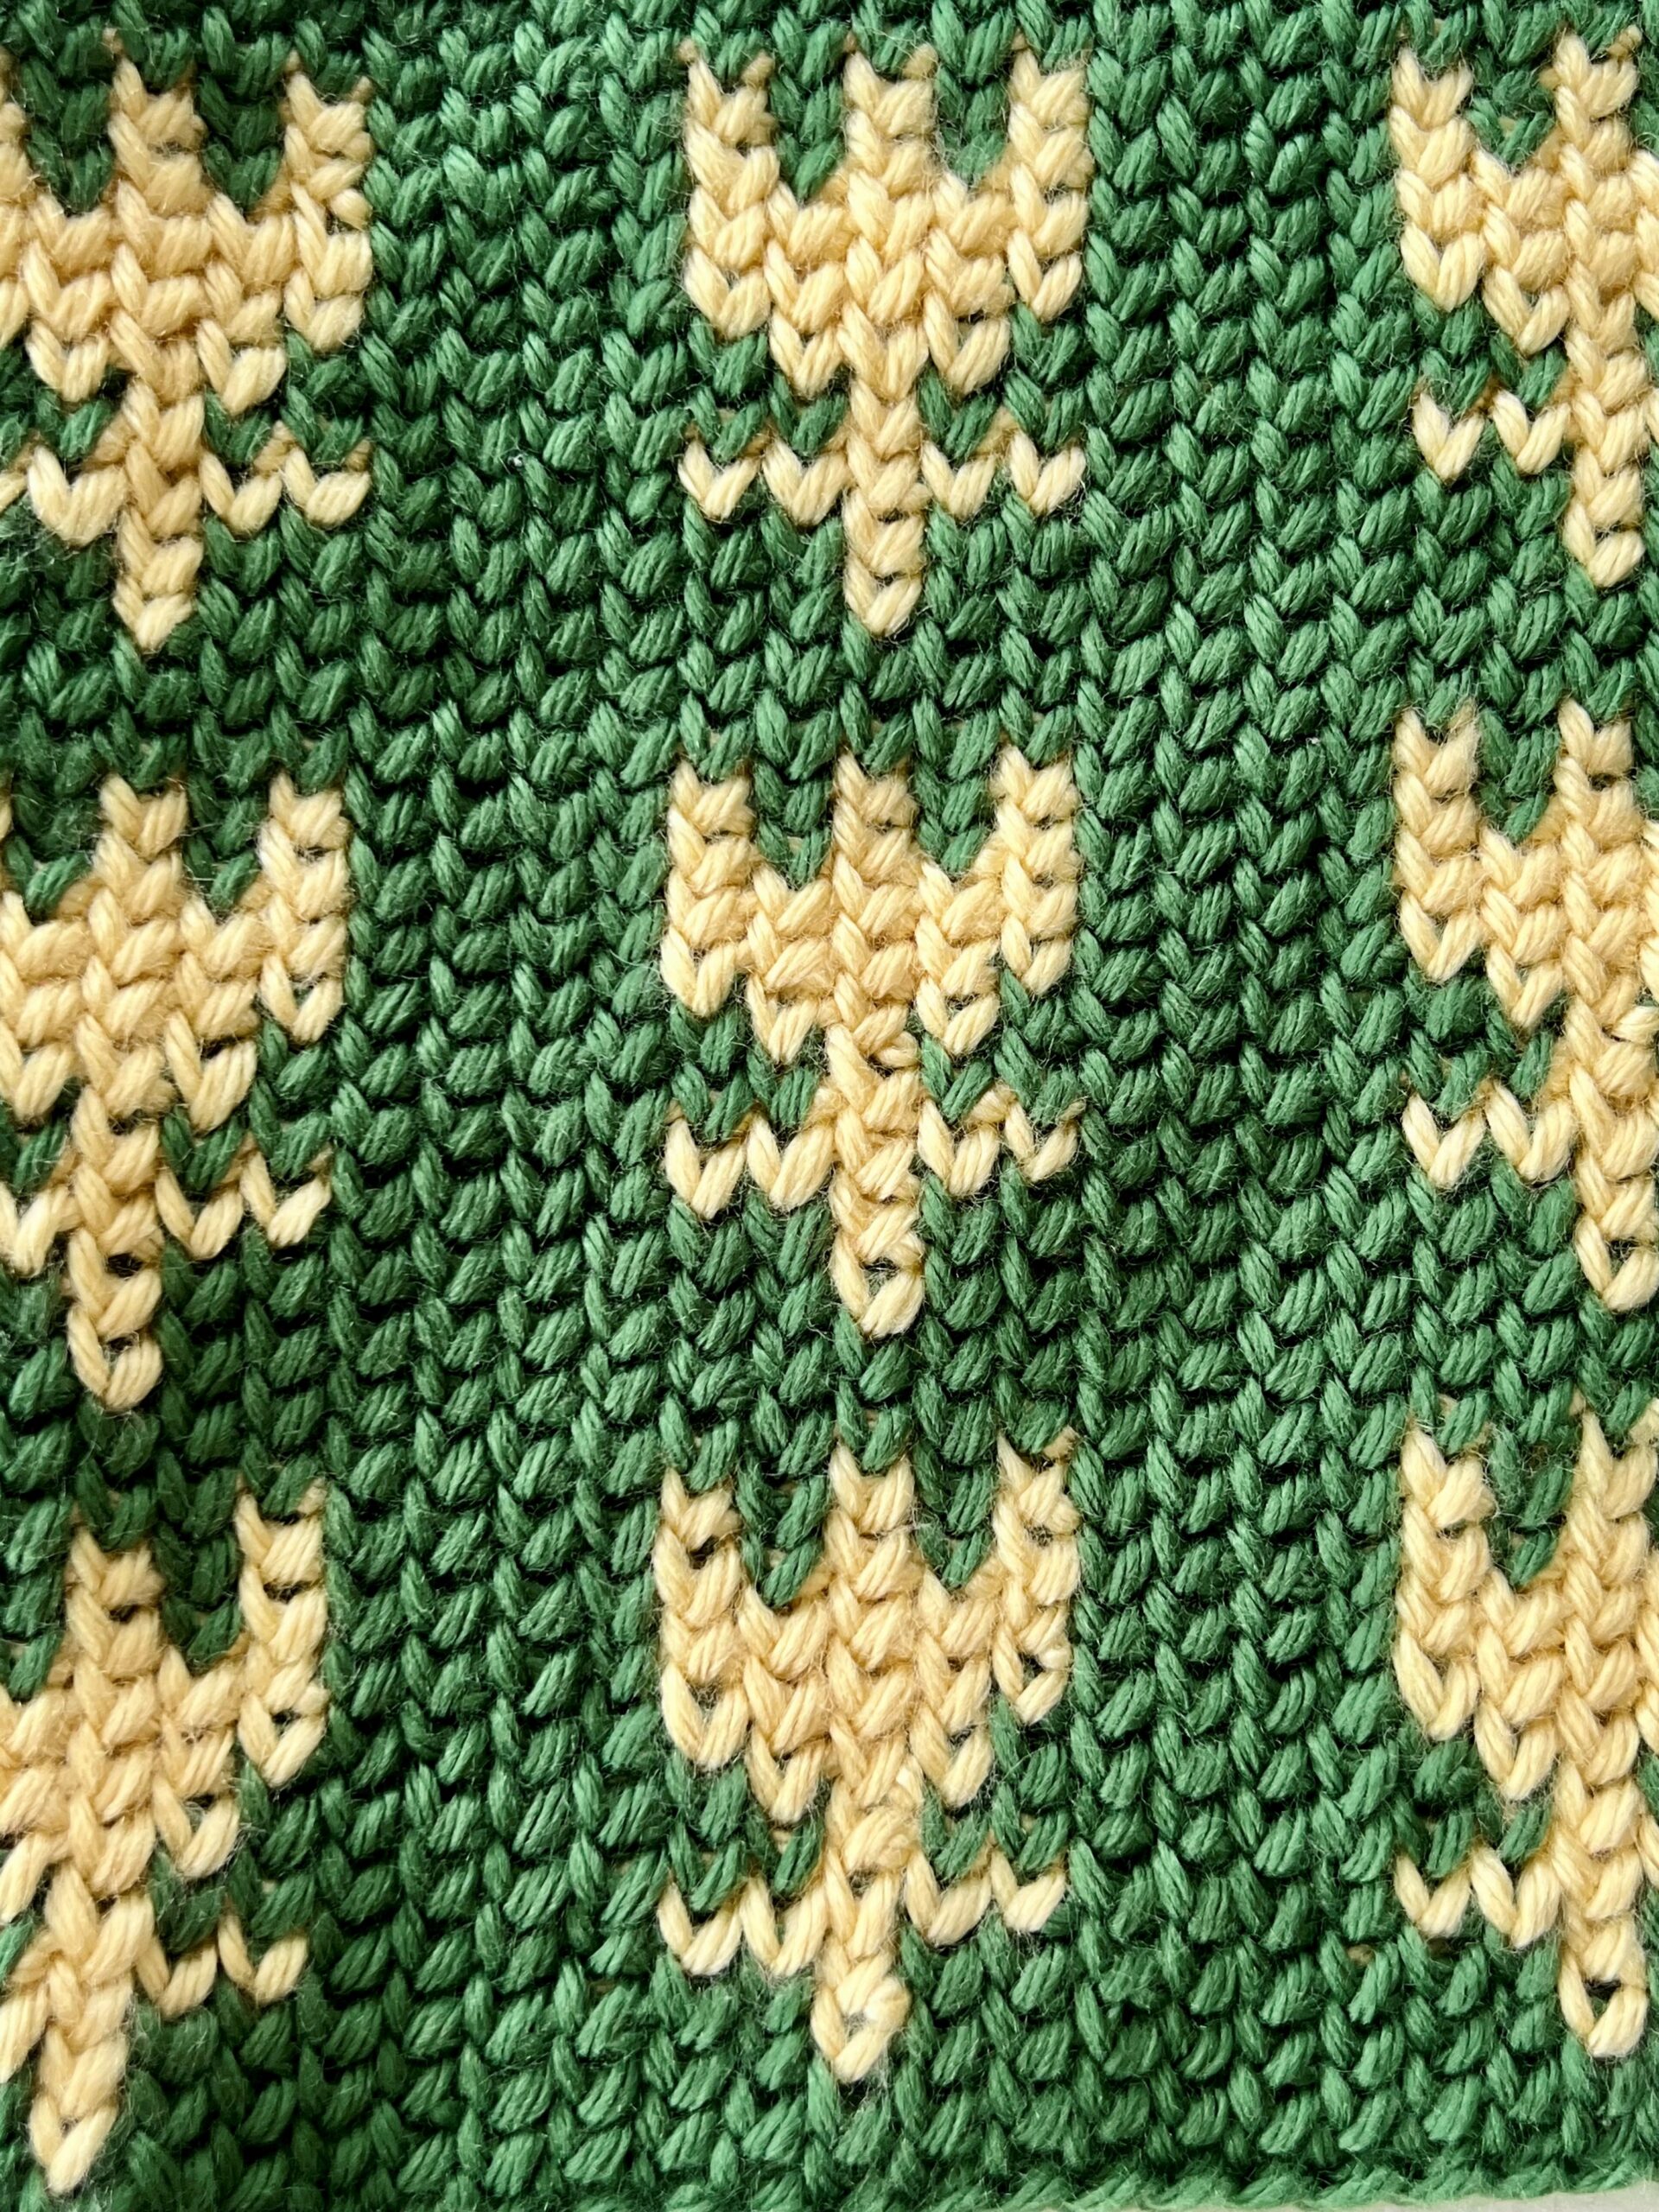
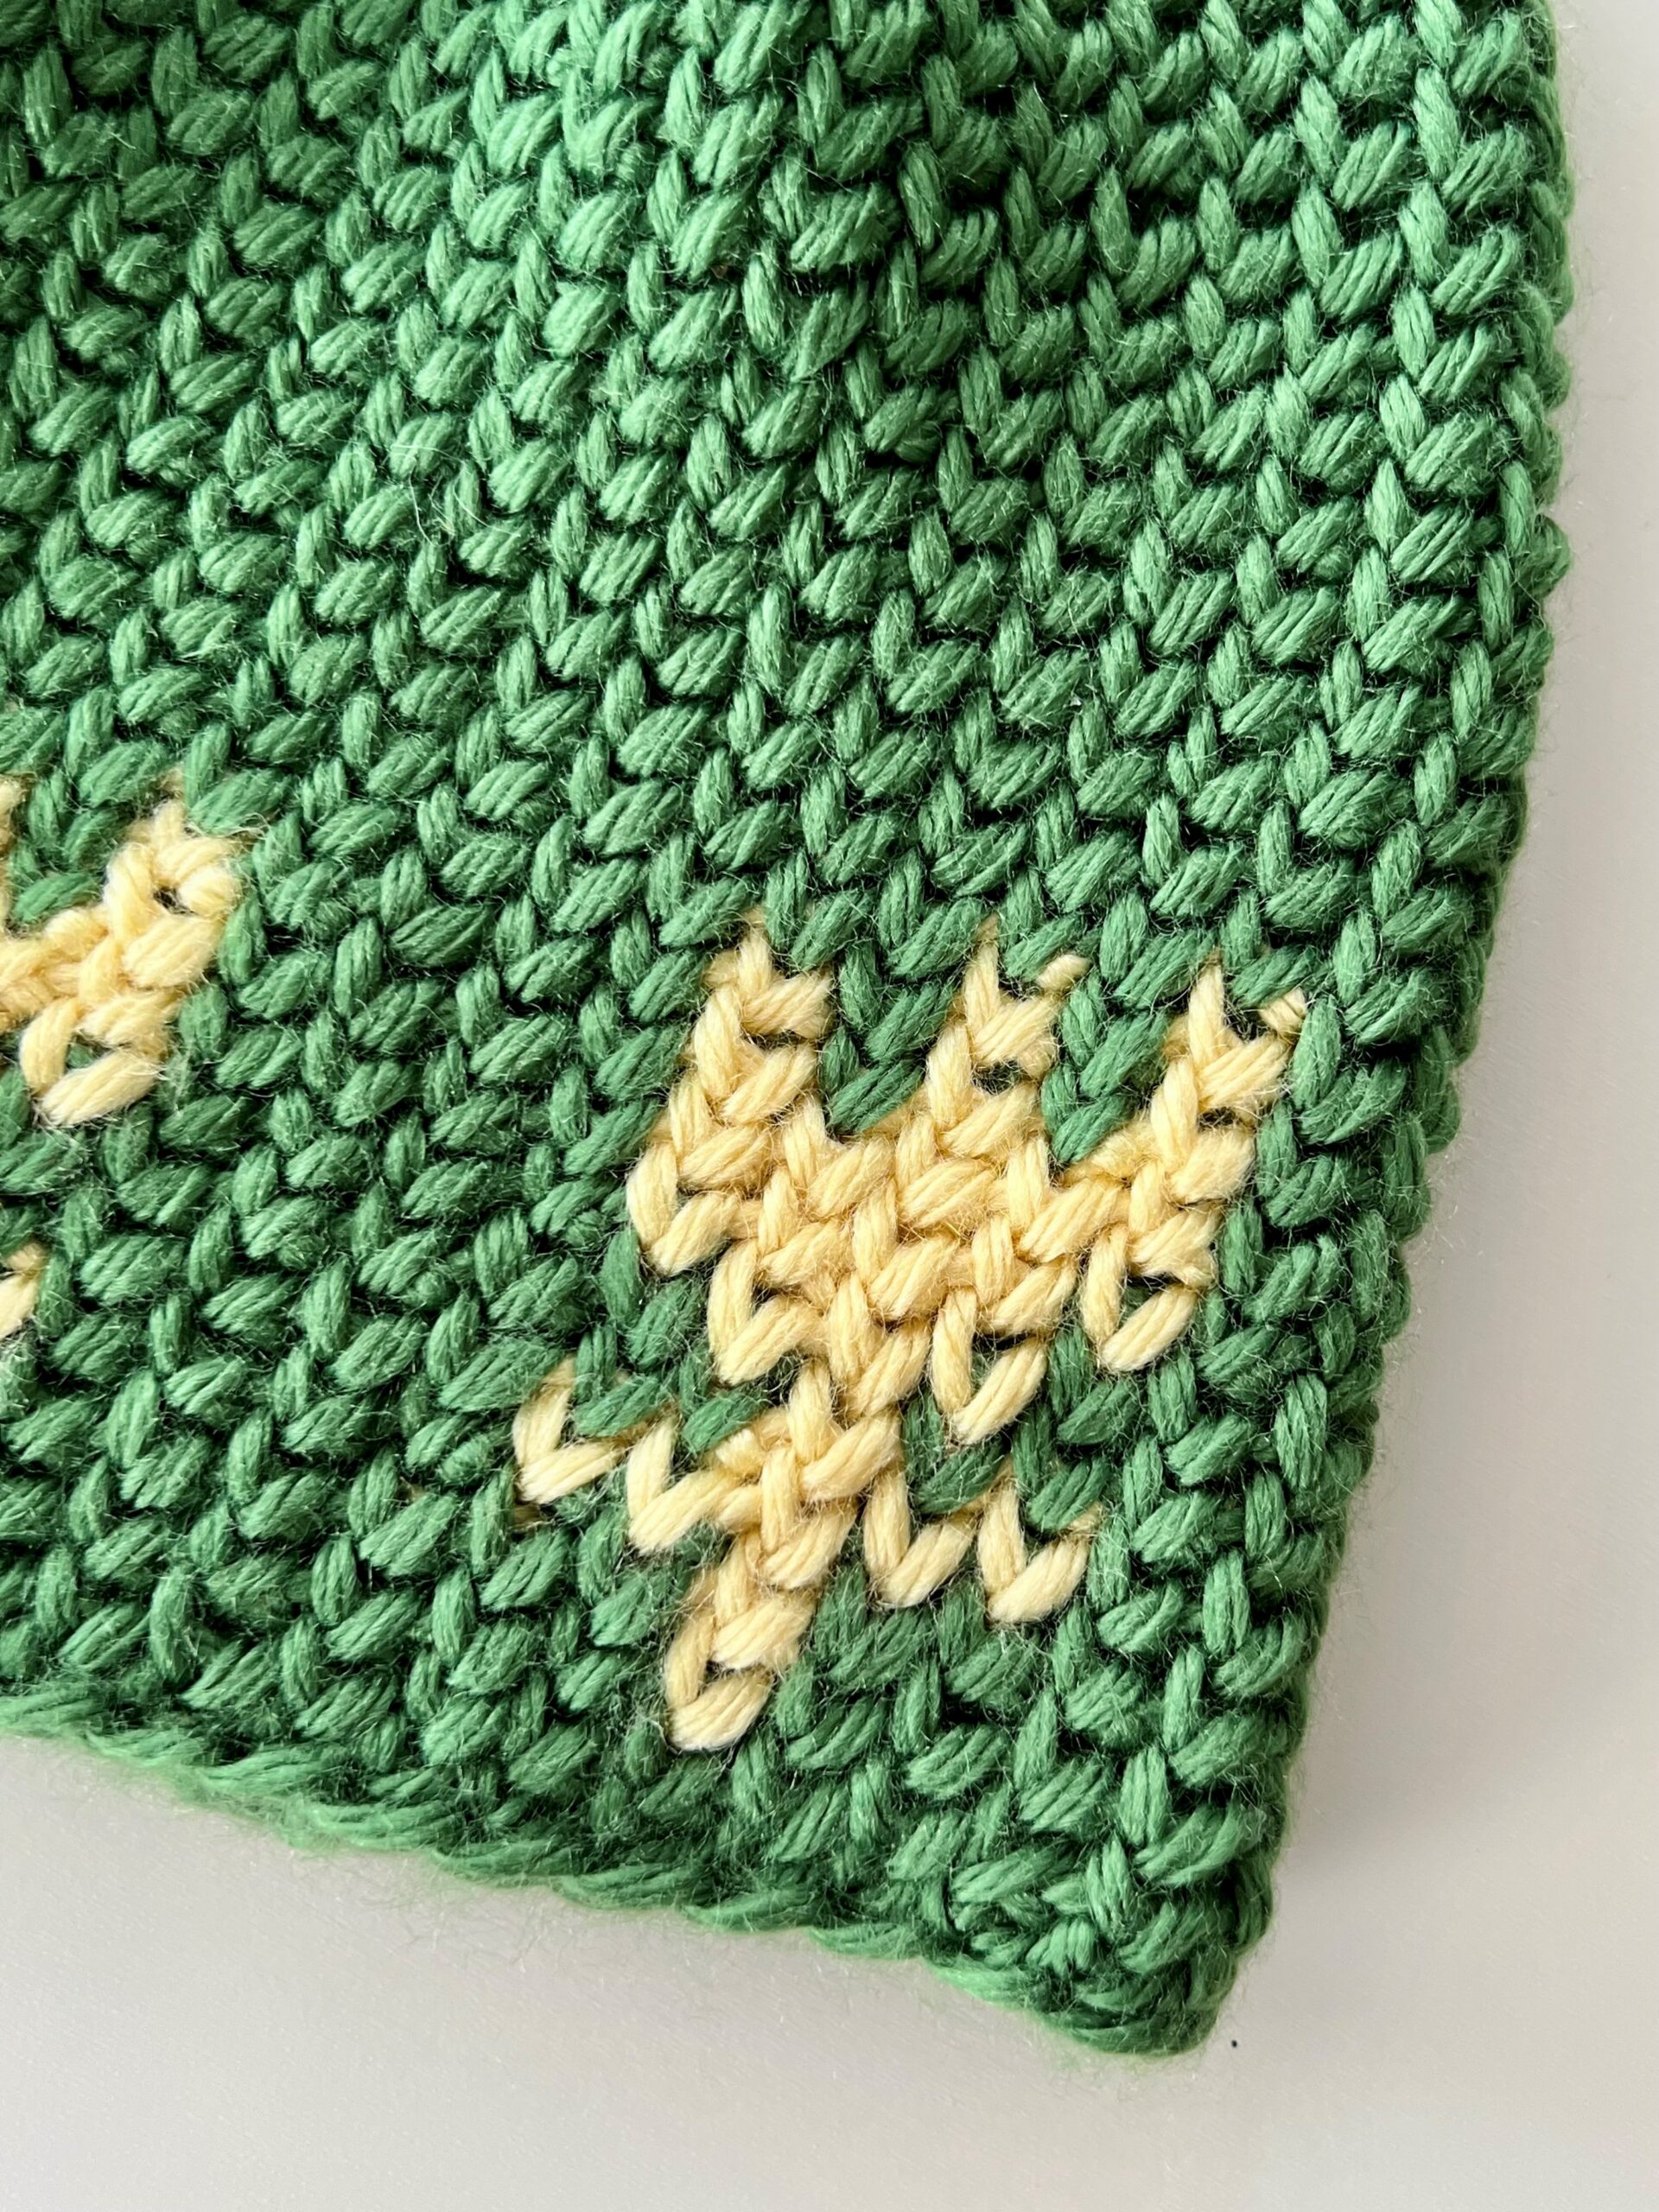
These accessories all use Furls’ Wander acrylic yarn in a brilliant grass green and a sunny buttery yellow and each accessory has the same tulip colorwork pattern to make the collection cohesive. The accessories are made using the waistcoat single crochet stitch, or you may have heard it called central single crochet. It’s an easy crochet stitch that produces a really lovely mimicry of knitted fabric, and it makes creating patterns a breeze. You can find out all the details on the collection below. Have fun making!
Instructions include:
- Construction + Fit/Ease
- Yarn Notes
- Yarn Amounts
- Hook Size
- Notions Required
- Gauge
- Sizes
- Stitch Abbreviations
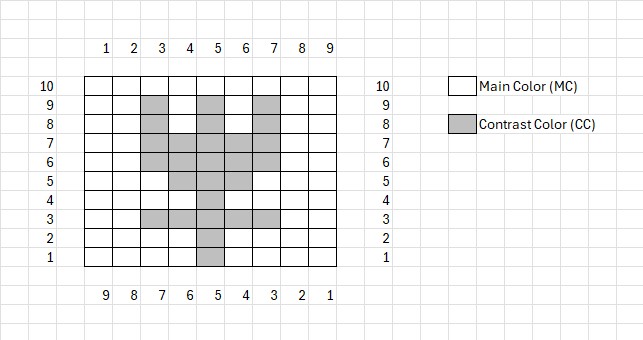
- The Tulip Colorwork Chart
- The Patterns! – Cowl, Earwarmer, Hat and Fingerless Mitts
- Finishing
- Copyright
Disclaimer: Some of the links included in this pattern are sponsored links, which means that if you choose to click on them, I’ll receive compensation from the company at no cost to you. By clicking on these links, you’ll help me be able to continue providing free patterns. It’s a win/win for both of us!
Construction + Fit/Ease
The First Signs of Springtime collection are all created with warmth in mind. Even though spring is coming, we’re still getting chilling winds so these accessories are made to fit tight and keep out the chill.
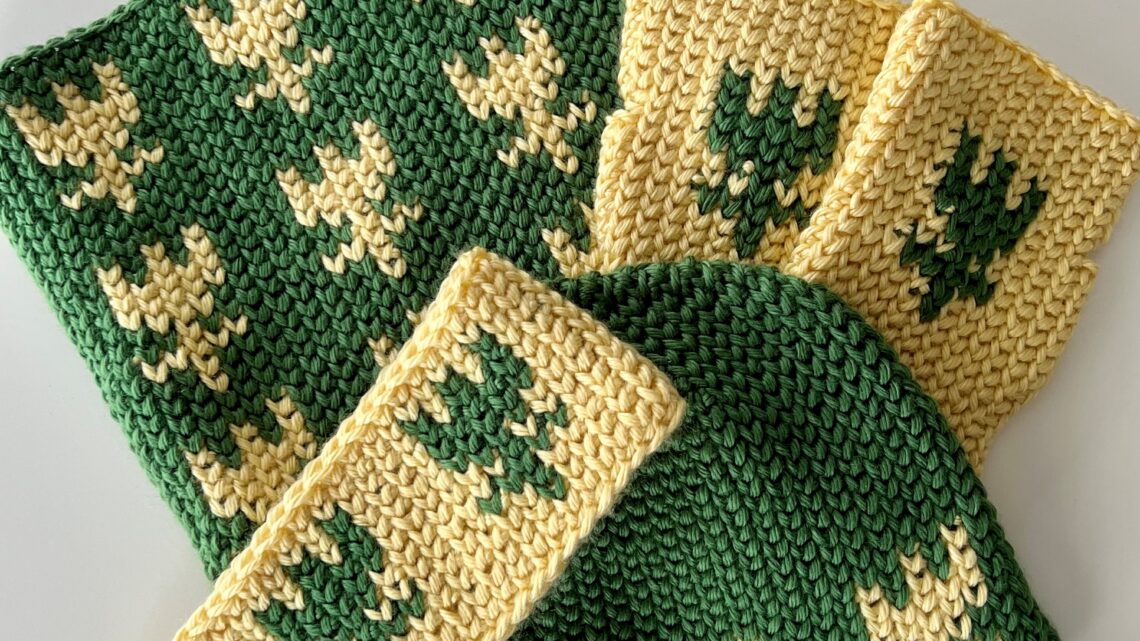
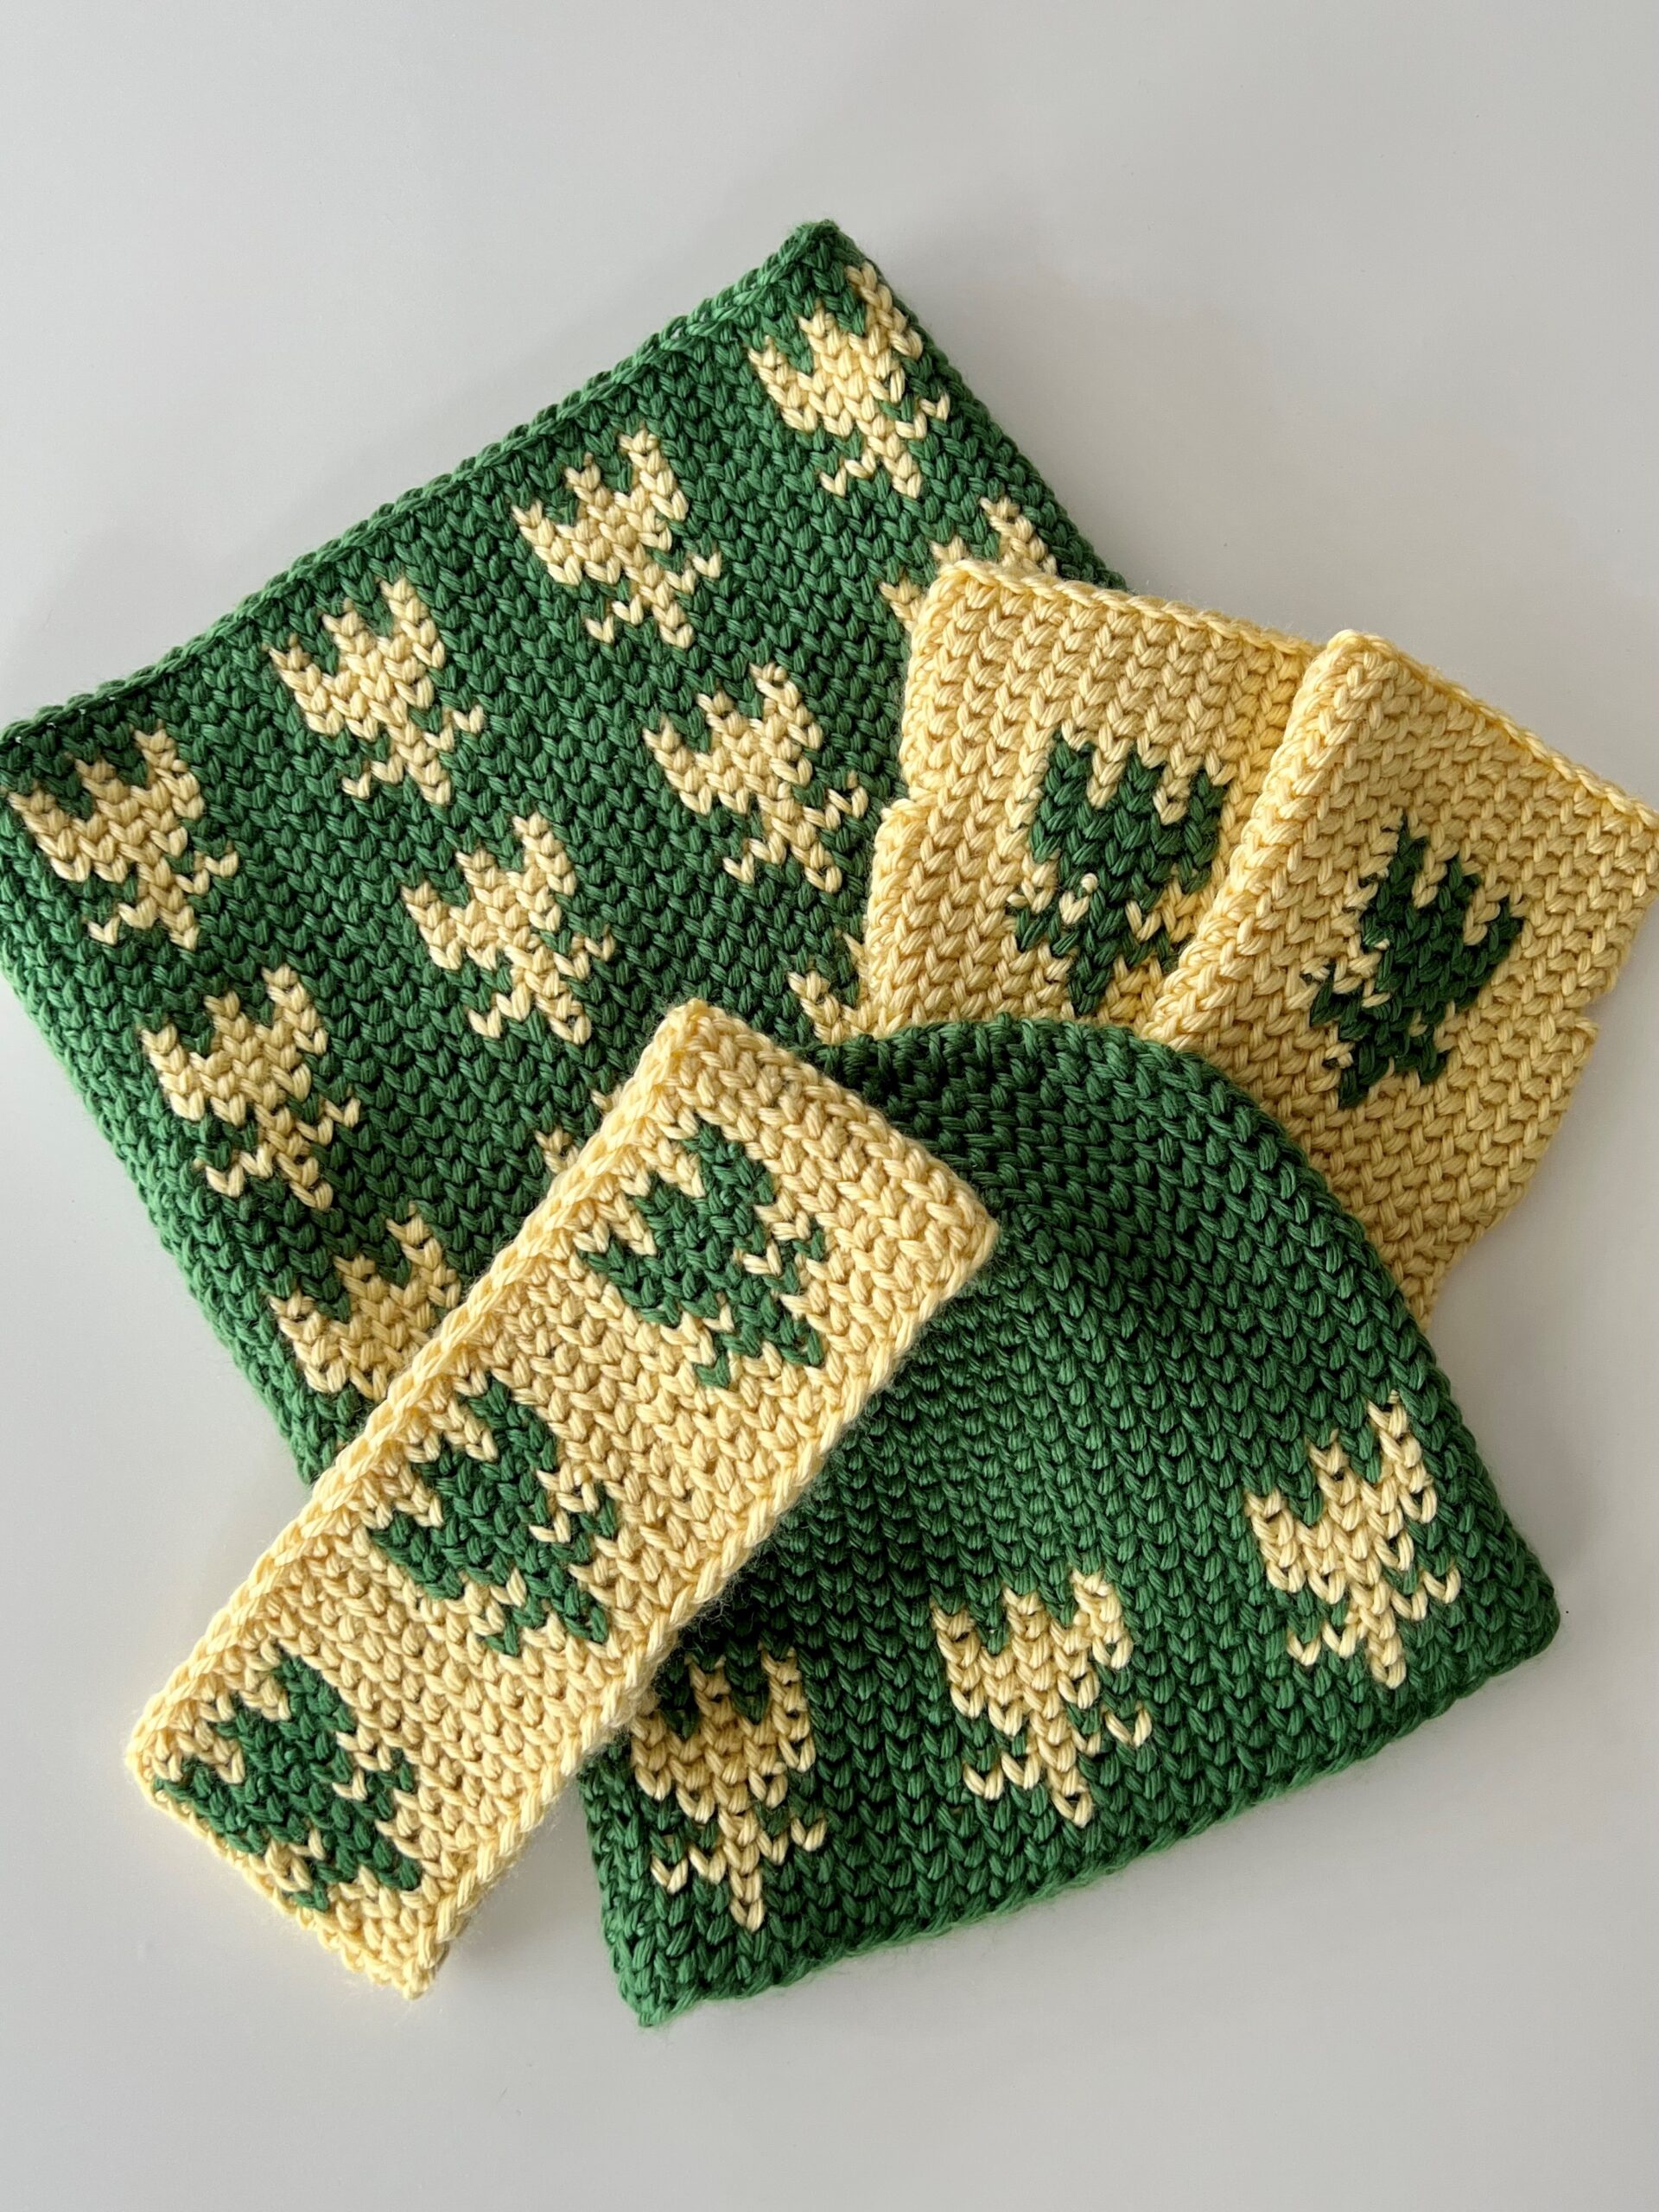
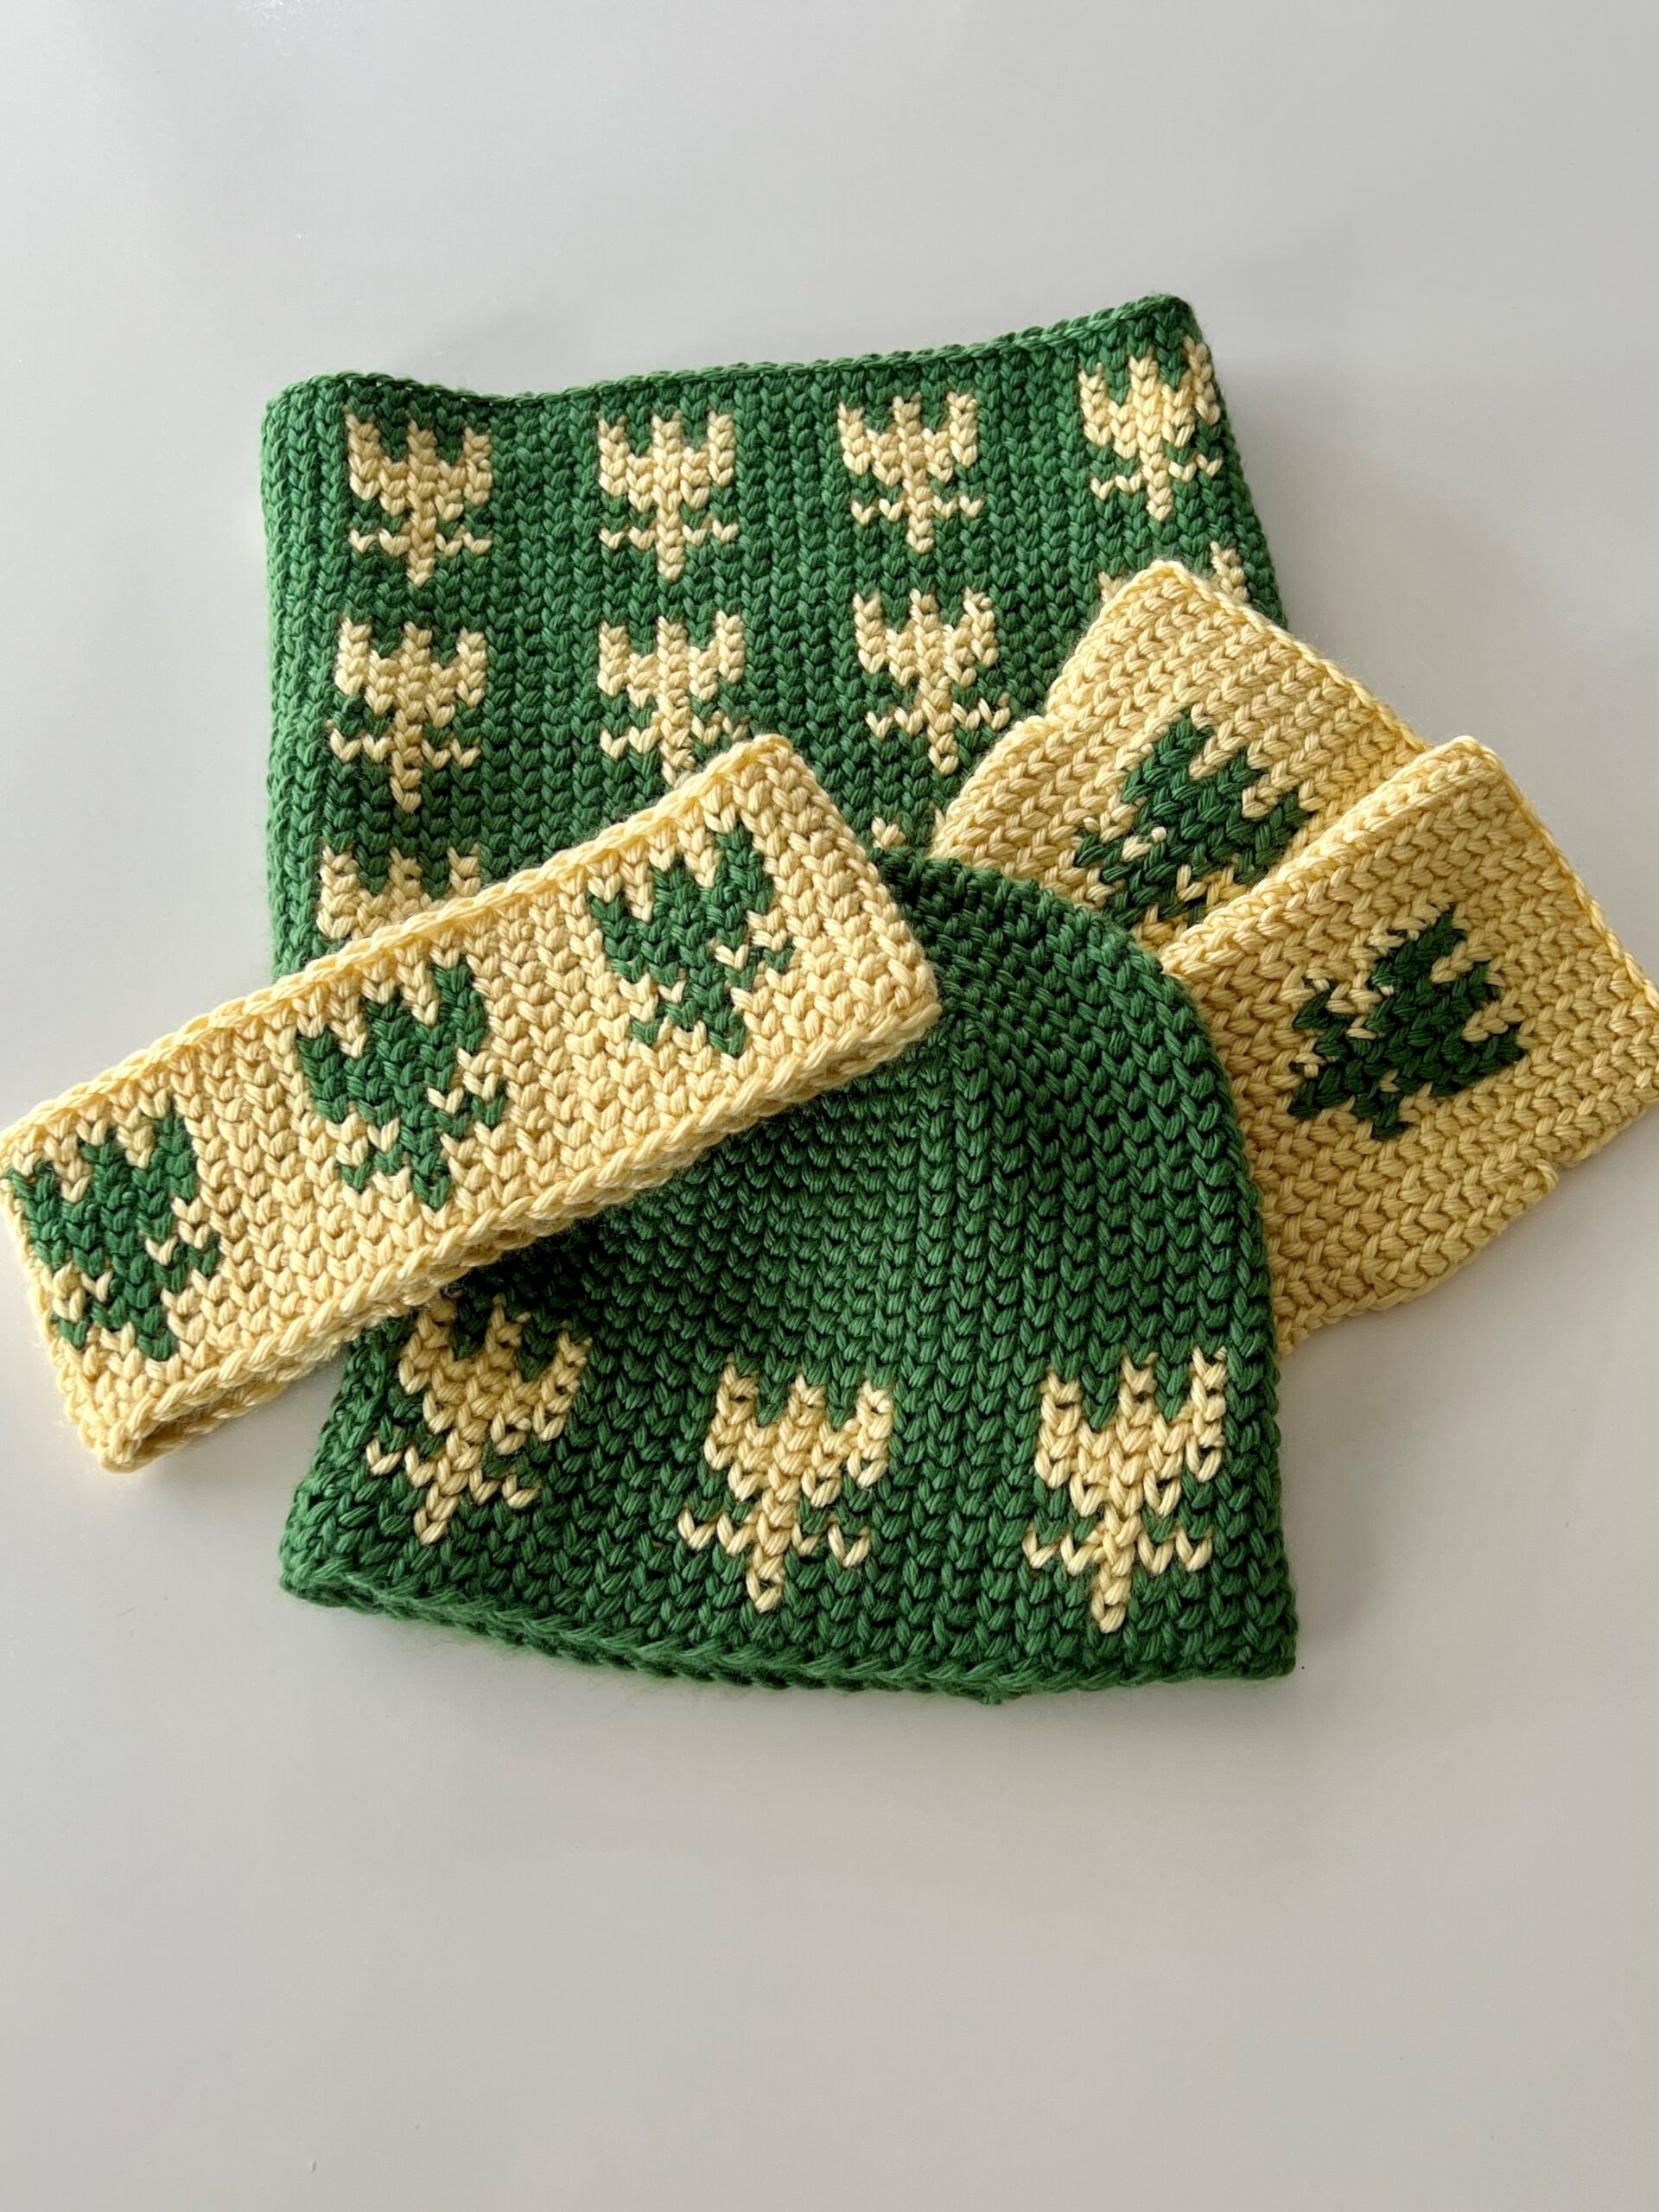
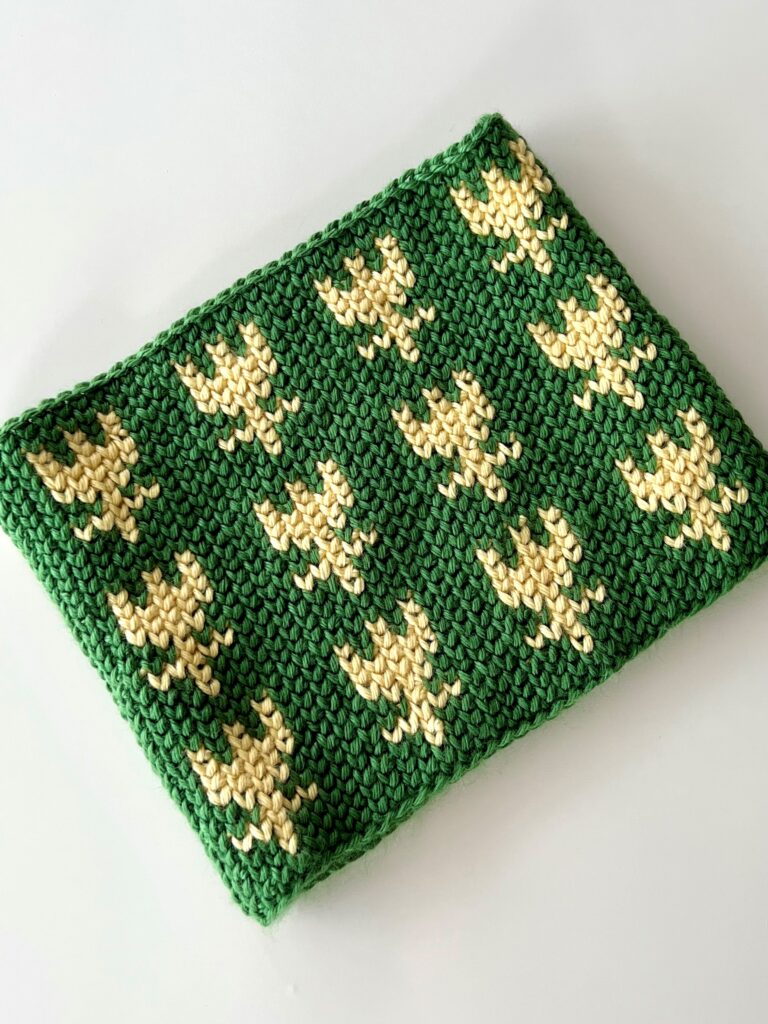
The cowl is made from the bottom up in the round with three horizontal repeats of the tulip colorwork chart. This cowl reminds me of the tulip fields in Holland with its rows and rows of tulips all around!
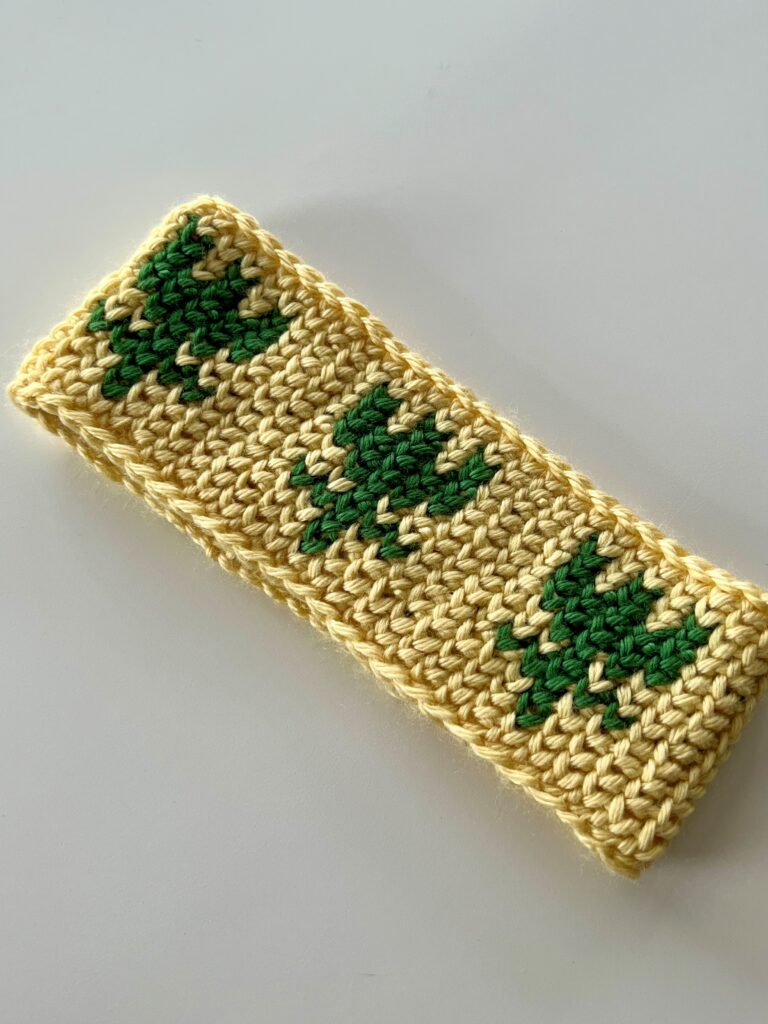
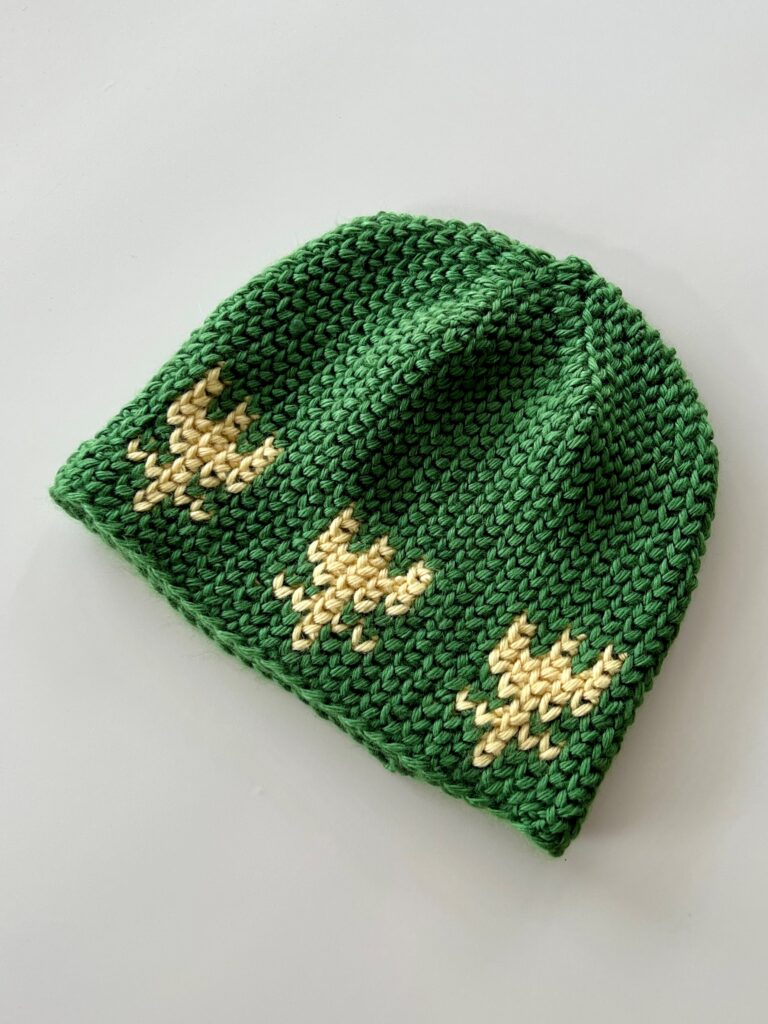
The hat and earwarmer are both constructed from the bottom up in the round with a single band of tulips encircling the earwarmer and the brim of the hat.
The fingerless mitts are also worked from the bottom up, starting at the wrist, then splitting for a thumb opening, and then continuing up the hand with the tulip pattern on the top of the hand. It’s made all in the round, in one piece, so there’s no seaming necessary once you’re done.
Yarn Notes
Wander Yarn has to be the most saturated acrylic yarn I’ve ever worked with! The color range is fabulous, and while the on-screen photos can’t really portray it, some of the colors of this yarn literally GLOW! Like seriously! Wander Yarn is a worsted weight size 4 yarn so projects work up quickly, and the ply is pretty good too so there’s not much splitting while you’re working with it. The only potential drawback is that it’s a bit slippery, so I’d recommend using wooden crochet hooks for beginners, but once you’ve got the hang of crocheting, this yarn flies off metal hooks like a dream! Here a link to Furls Wander Yarn so you can explore the color options for your own First Signs of Springtime crochet collection. The cost is a really great price point for all budgets and you get a great amount of yardage for the price.
Furls Wander Acrylic Yarn – I used the colors Arbor (green) and Meringue (yellow) for this collection and they’re such perfect springtime colors.

Yarn Amounts
- MC: 5 skeins Furls Wander Acrylic Yarn in Arbor, 100%Acrylic, 100g/120yds/109m
- CC: 4 skeins Furls Wander Acrylic Yarn in Meringue, 100%Acrylic, 100g/120yds/109m
You’ll need one skein of green and one skein of yellow for each accessory except for the hat. For the hat you’ll need two skeins of green and one skein of yellow. This gives you enough yardage to swatch the tulip motif in waistcoat stitch plus make one accessory. But if you love matching sets like I do, get all 9 skeins for less than $50!
Hook
Size I 5.5mm hook – I used this Furls hook, the Gold Streamline Metal Crochet hook. If you’re a beginner and haven’t used Wander yarn before, then I’d recommend the classic Wood Streamline hooks. I’ve got the wood hooks in Teak, Laurel and Silver Oak and they’re beautiful and have a great hand feel. If you haven’t used a Furls hook before, you’re definitely missing out! They have beautiful, ergonomic hooks made out of wood and metal and acrylic that are smooth, perfectly balanced, and a joy to work with. I highly recommend you try them out.
Notions
Embroidery Needle for weaving in ends
Scissors for cutting ends
Gauge
12 sts x 16 rows = 4 in x 4 in in waistcoat stitch
Size
The cowl is just one size which should fit most people. The hat and earwarmer are written in size Adult Small, and the fingerless mits are written in size Adult Medium.
Stitch Abbreviations
- CC = contrast color
- Ch = chain
- MC = main color
- SC = single crochet
- Sl st = slip stitch
- St = stitch
- Wsc = waistcoat stitch. You’ll work the waistcoat stitch the same as a single crochet, except you insert your hook into the v under the top of the stitch. Insert hook into the v, yarn over, pull up a loop, yarn over, pull up another loop, yarn over, pull through both loops on the hook.
- WscDec1 = waistcoat stitch decrease 1. Insert hook into top of next st where you’d normally crochet into, yo, pull up a loop, insert hook into v of next st, yo, pull up a loop, yo, pull through all three loops on hook.
- WscDec2 = waistcoat stitch decrease 2. Insert hook into v of next st, yo, pull up a loop, insert hook into top of next st where you’d normally crochet into, yo, pull up a loop, yo, pull through all three loops on hook.
- WscInc1 = waistcoat stitch increase 1. Insert hook into top of next stitch where you’d normally crochet into, yo, pull up a loop,yo, pull through both loops (first st – reg sc – made), insert hook into the v of the same stitch, yo, pull up a loop, yo, pull through both loops (second st – wsc st- made). On the next round you’ll work a wsc into the sc stitch.
- WscInc2 = waistcoat stitch increase 2. Insert hook into v of the next stitch, yo, pull up a loop, yo, pull through both loops on hook (first st – wsc st – made), insert hook into top of the same stitch where you’d normally work a crochet st, yo, pull up a loop, yo, pull through both loops on hook (second st – sc st – made). On the next round you’ll work a wsc into the sc st.
- Yo = yarn over
Tulip Colorwork Chart
Cowl Pattern
Notes:
- Ch 1 does not count as a st throughout pattern.
- MC is noted in plain text in pattern instructions.
- CC is noted in bold text in pattern instructions.
- For the cowl, my MC is Arbor (green) and my CC is Meringue (yellow).
Foundation Round: Using I hook, ch 72 sts. Join. Ch 1.
Round 1: Sc into the back bumps of the ch all the way around. Join with sl st in top of first sc. Ch 1. 72 sc
Round 2: Wsc around. Join with sl st in top of first wsc. Ch 1. 72 wsc.
Round 3 (Begin Chart): *4 wsc, wsc, 4 wsc, repeat from * to end. Join with sl st in top of first wsc. ch 1. 72 wsc.
Round 4: *4 wsc, wsc, 4 wsc, repeat from * to end. Join with sl st in top of first wsc. ch 1. 72 wsc.
Round 5: *2 wsc, 5 wsc, 2 wsc, repeat from * to end. Join with sl st in top of first wsc. ch 1. 72 wsc.
Round 6: *4 wsc, wsc, 4 wsc, repeat from * to end. Join with sl st in top of first wsc. ch 1. 72 wsc.
Round 7: *3 wsc, 3 wsc, 3 wsc, repeat from * to end. Join with sl st in top of first wsc. ch 1. 72 wsc.
Round 8: *2 wsc, 5 wsc, 2 wsc, repeat from * to end. Join with sl st in top of first wsc. ch 1. 72 wsc.
Round 9: Repeat round 8. 72 wsc.
Round 10: *2 wsc, wsc, wsc, wsc, wsc, wsc, 2 wsc, repeat from * to end. Join with sl st in top of first wsc. ch 1. 72 wsc.
Round 11: Repeat round 10. 72 wsc.
Rounds 12-13: Wsc around. Join with sl st in top of first wsc. ch 1. 72 wsc.
Repeat rounds 3-13 twice more. Fasten off. Move to Finishing.
Earwarmer Pattern
Notes:
- Ch 1 does not count as a st throughout pattern.
- MC is noted in plain text in pattern instructions.
- CC is noted in bold text in pattern instructions.
- For the earwarmer, my MC is Meringue (yellow) and my CC is Arbor (green).
Foundation Round: Using I hook, ch 56 sts. Join. Ch 1.
Round 1: Sc into the back bumps of the ch all the way around. Join with sl st in top of first sc. Ch 1. 56 sc
Round 2: Wsc around. Join with sl st in top of first wsc. Ch 1. 56 wsc.
Round 3 (Begin Chart): *4 wsc, wsc, 4 wsc, repeat from * to end. Join with sl st in top of first wsc. ch 1. 56 wsc.
Round 4: *4 wsc, wsc, 4 wsc, repeat from * to end. Join with sl st in top of first wsc. ch 1. 56 wsc.
Round 5: *2 wsc, 5 wsc, 2 wsc, repeat from * to end. Join with sl st in top of first wsc. ch 1. 56 wsc.
Round 6: *4 wsc, wsc, 4 wsc, repeat from * to end. Join with sl st in top of first wsc. ch 1. 56 wsc.
Round 7: *3 wsc, 3 wsc, 3 wsc, repeat from * to end. Join with sl st in top of first wsc. ch 1. 56 wsc.
Round 8: *2 wsc, 5 wsc, 2 wsc, repeat from * to end. Join with sl st in top of first wsc. ch 1. 56 wsc.
Round 9: Repeat round 8. 56 wsc.
Round 10: *2 wsc, wsc, wsc, wsc, wsc, wsc, 2 wsc, repeat from * to end. Join with sl st in top of first wsc. ch 1. 56 wsc.
Round 11: Repeat round 10. 56 wsc.
Rounds 12-13: Wsc around. Join with sl st in top of first wsc. 56 wsc.
Fasten off. Move to Finishing.
Hat Pattern
Notes:
- Ch 1 does not count as a st throughout pattern.
- MC is noted in plain text in pattern instructions.
- CC is noted in bold text in pattern instructions.
- For the hat, my MC is Arbor (green) and my CC is Meringue (yellow).
Foundation Round: Using I hook, ch 56 sts. Join. Ch 1.
Round 1: SC into the back bumps of the ch all the way around. Join with sl st in top of first sc. Ch 1. 56 sc
Round 2: Wsc around. Join with sl st in top of first wsc. Ch 1. 56 wsc.
Round 3 (Begin Chart): *4 wsc, wsc, 4 wsc, repeat from * to end. Join with sl st in top of first wsc. ch 1. 56 wsc.
Round 4: *4 wsc, wsc, 4 wsc, repeat from * to end. Join with sl st in top of first wsc. ch 1. 56 wsc.
Round 5: *2 wsc, 5 wsc, 2 wsc, repeat from * to end. Join with sl st in top of first wsc. ch 1. 56 wsc.
Round 6: *4 wsc, wsc, 4 wsc, repeat from * to end. Join with sl st in top of first wsc. ch 1. 56 wsc.
Round 7: *3 wsc, 3 wsc, 3 wsc, repeat from * to end. Join with sl st in top of first wsc. ch 1. 56 wsc.
Round 8: *2 wsc, 5 wsc, 2 wsc, repeat from * to end. Join with sl st in top of first wsc. ch 1. 56 wsc.
Round 9: Repeat round 8. 56 wsc.
Round 10: *2 wsc, wsc, wsc, wsc, wsc, wsc, 2 wsc, repeat from * to end. Join with sl st in top of first wsc. ch 1. 56 wsc.
Round 11: Repeat round 10. 56 wsc.
Rounds 12-28: Wsc around. Join with sl st in top of first wsc. Ch 1. Place markers in sts 9, 18, 27, 36, 45, and 56. 56 sts.
Round 27: *Wsc to 1 st before marker, WscDec1 in the next two sts if you’re left-handed and WscDec2 in the next 2 sts if you’re right handed, move marker into st just made, repeat from * around. Join with sl st in top of first wsc. Ch 1. 7 sts decreased. 45 sts.
Round 28: Wsc around. 45 sts.
Repeat rounds 27 and 28 four more times. 9 sts remaining.
Cut a long tail and use embroidery needle to pull tail through remaining 9 sts. Pull to close.
Fasten off. Move to Finishing.

Fingerless Mitts Pattern
Notes:
- Ch 1 does not count as a st throughout pattern.
- MC is noted in plain text in pattern instructions.
- CC is noted in bold text in pattern instructions.
- For the fingerless mitts, my MC is Meringue (yellow) and my CC is Arbor (green).
- You’ll make 2 mitts using the instructions for the wrist and hand for both mitts. For the first mitt follow thumb gusset instructions for Mitt 1, and for the second one follow thumb gusset instructions for Mitt 2.
Wrist – Both Mitts
Foundation Round: Using I hook, ch 21 sts. Join. Ch 1. 21 sts.
Round 1: SC into the back bumps of the ch all the way around. Join with sl st in top of first sc. Ch 1. 21 sc
Round 2-13: Wsc around. Join with sl st in top of first wsc. Ch 1. 21 wsc.
Note: Begin Thumb Gussets & Colorwork. Use the following instructions for Mitt 1 and Mitt 2.
Thumb Gusset & Colorwork for Mitt 1
Note: For this section you will work the gusset only for 3 rounds, then you will continue to work the gusset AND work the colorwork chart at the SAME time.
Round 14: 4 wsc, WscInc1, 2 wsc, WscInc2, wsc to end. Join with a sl st in top of first wsc. Ch 1. 23 sts.
Round 15: Wsc around. Join with a sl st in top of first wsc. Ch 1. 23 sts.
Round 16: Repeat round 14. 25 sts.
Note: Pm in st 12. When you get to st 12 on rounds 17-25 follow the colorwork chart while ALSO working the rest of the thumb gusset instructions. St 12 = st 1 on the colorwork chart.
Rounds 17-22: Wsc around. 25 wsc.
Round 23: 6 wsc, ch 4, wsc to end. Join with a sl st in top of first wsc. Ch 1. 25 sts.
Round 24: 6 wsc, sc into each ch st, wsc to end. Join with a sl st in top of first wsc. Ch 1. 25 sts.
Round 25: Wsc around. Join with a sl st in top of first wsc. Ch 1. 25 wsc.
Thumb Gussett & Colorwork for Mitt 2
Note: For this section you will work the gusset only for 3 rounds, then you will continue to work the gusset AND work the colorwork chart at the SAME time.
Round 14: 15 wsc, WscInc2, 2 wsc, WscInc1, wsc to end. Join with a sl st in top of first wsc. Ch 1. 23 sts.
Round 15: Wsc around. Join with a sl st in top of first wsc. Ch 1. 23 sts.
Round 16: Repeat round 14. 25 sts.
Note: Pm in st 7. When you get to st 7 on rounds 17-25 follow the colorwork chart while ALSO working the rest of the thumb gusset instructions. St 7 = st 1 on the colorwork chart.
Rounds 17-22: Wsc around. 25 wsc.
Round 23: 16 wsc, ch 4, wsc to end. Join with a sl st in top of first wsc. Ch 1. 25 sts.
Round 24: 16 wsc, sc into each ch st, wsc to end. Join with a sl st in top of first wsc. Ch 1. 25 sts.
Round 25: Wsc around. Join with a sl st in top of first wsc. Ch 1. 25 wsc.
Hand – Both Mitts
Rounds 26 – 31: Wsc around. Join with sl st in top of first wsc. ch 1. 25 wsc.
Fasten off. Move to Finishing.
Finishing
Wet block all pieces, weave in ends, cut tails, and enjoy your new collection!
Copyright Notes
It’s not nice to copy other people’s work so let’s not do that! All text and photos copyright 2024 by Regarding Yarn. No part of this pattern may be duplicated or sold. Final products made from this pattern are for personal use only and may not be sold.
Happy Crocheting!